¿Estás Ready para dar el salto y tener tu propia página web, pero la idea de la instalación de WordPress te parece un laberinto? ¡Respira hondo! Aquí en Biblioweb, entendemos que empezar can intimidar y que cada clic cuenta. Por eso, hemos creado esta guía exhaustiva para que el proceso de configurar tu site sea claro, sencillo y hasta divertido. No importa si eres un principiante absoluto o si ya you have algo de experiencia, te acompañaremos paso a paso para que tu site web vea la luz sin dramas ni confusiones, abriendo las puertas a tu presencia digital.
⏱ 20 min de lectura · 4347 palabras
Before starting
To ensure a smooth and uninterrupted process, it is essential that you have some key elements ready. Consider this as preparing your workspace before embarking on an important project. Having these resources in advance will save you time and potential frustrations.
- Stable internet connection: A good connection is crucial for downloading files, accessing control panels, and performing all necessary configurations without interruptions.
- Access to web hosting with Cpanel (if you choose this option): If you plan for your site to be online, you will need a hosting provider that offers you a control panel like Cpanel, which greatly simplifies management.
- A registered domain: The unique address of your website on the internet (e.g. biblioweb.com). Make sure it is active and pointing correctly to your hosting.
- XAMPP or MAMP software (for local installation): Si tu intención es desarrollar o probar WordPress en tu propio ordenador sin que sea público, estas herramientas son indispensables para simular un entorno de servidor.
- Ganas de aprender y create: Attitude is key. With a little patience and curiosity, you will master instalación de WordPress in no time.
- Access credentials: Have your Cpanel (if applicable) and FTP account access details handy.
Basic knowledge of navigating the
The instalación de WordPress puede llevarte entre 15 y 60 minutos, dependiendo del método que elijas y de tu familiaridad con el entorno técnico. Hemos clasificado esta guía como de dificultad “Principiante a Intermedio”. Nuestro objetivo es desglosar cada paso de manera que incluso si es tu primera vez, te sientas cómodo y seguro. ¡No te preocupes, estamos aquí para guiarte en cada click!
Related terms:
- Configure WordPress
- Migrar WordPress
- WordPress hosting
- WordPress local
- Create a blog
- CMS WordPress
- Optimizar WordPress
- WordPress para principiantes
Step 1: Choose your Playing Field: Hosting, Cpanel or Local
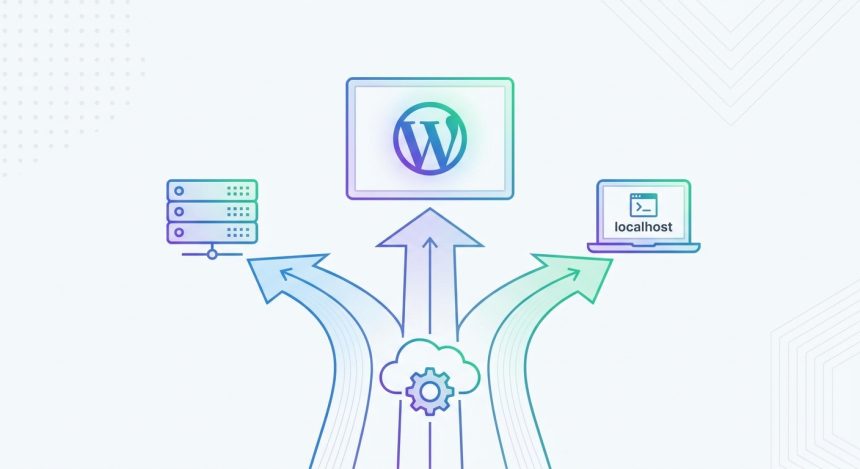
Este es el primer gran paso y quizás el más importante en tu viaje hacia la instalación de WordPress. Decidir dónde vas a install tu sitio es como choose el terreno para construir tu casa: cada opción tiene sus peculiaridades y es crucial para el futuro de tu proyecto. Tu elección dependerá de tus objetivos a corto y largo plazo, tu presupuesto disponible y tu nivel de comodidad con la tecnología. Entender bien cada una de estas alternativas te ahorrará muchos dolores de cabeza y te permitirá seleccionar la ruta más adecuada para ti.
- Web Hosting (Recommended for most): Esta es la opción estándar si quieres que tu sitio sea accesible para todo el world desde el primer momento. Implica contratar un proveedor de hosting que almacene los archivos de tu web y un dominio para que la gente te encuentre. Es la base para any proyecto online serio.
- Cpanel (Ease and Automation): Si tu servicio de hosting incluye Cpanel (como la gran mayoría de los proveedores hoy en día), tendrás a tu disposición instaladores automáticos como Softaculous. Esta tool es una bendición para los principiantes, ya que automatiza casi todo el proceso de instalación de software, incluyendo WordPress, con solo unos pocos clics.
- Instalación Local (Para pruebas y development): Perfecto si tu intención es experimentar, aprender, desarrollar un sitio web o probar nuevas funcionalidades sin que esté online. Necesitarás software como XAMPP o MAMP para create un entorno de servidor en tu propio ordenador. Es ideal para prácticas y para tener un “laboratorio” personal.
Tip: If your main goal is to have a public and functional website quickly, the hosting option with Cpanel is the most efficient and recommended. It allows you to skip many technical steps and focus on the content.
How to verify it worked: You will have made a clear and informed decision about where you will host your future website. You will have an address in mind for the next steps.
Step 2: Preparing the Ground: Domain and Hosting (If you choose this path)
If you have decided to go the hosting route for your instalación de WordPress, este paso es absolutamente crucial. Antes de poder install any cosa, necesitas un lugar donde “vivirá” tu sitio web y una dirección única para que la gente lo encuentre en el vasto world de internet. Imagina este paso como comprar un terreno y registrar la dirección de tu nueva casa antes de comenzar la construcción. Es la base sobre la que se edificará toda tu presencia online.
- Register a Domain: Choose a name that is memorable, relevant to your brand, and easy to remember (e.g. biblioweb.com). Then, register it through a domain provider of your choice. Make sure the name is available and that the extensions (.com, .es, .net) suit your target audience.
- Hire a Hosting: Investiga y selecciona un proveedor de hosting confiable que ofrezca buen soporte técnico, speed adecuada para tus necesidades y, preferiblemente, acceso a Cpanel. Hay una amplia gama de opciones en el mercado, desde hosting compartido económico hasta servidores privados virtuales (VPS) más potentes, dependiendo de la escala de tu proyecto.
- Point the Domain to the Hosting: Once you have your domain and hosting, you will need to configure your domain's name servers (DNS) to point to your hosting's servers. Your hosting provider will give you exact instructions on how to do this configuration, which generally involves copying and pasting a couple of DNS addresses into your domain registrar's settings.
Notice: This DNS propagation process can take a few hours to complete globally, and even up to 24-48 hours in some extreme cases. During this time, your domain might not show your hosting page immediately. Patience, it's a normal process!
Cómo verificar que ha funcionado: Al ingresar tu dominio en el navegador, deberías ver una página genérica de “sitio en construcción” de tu hosting, o una página de bienvenida que indique que el dominio ha sido conectado exitosamente. Si aún ves un error o una página antigua, espera un poco más o revisa la configuración de DNS.
Step 3: Automatic WordPress Installation with Softaculous (Via Cpanel)
This is, without a doubt, the fastest and easiest way to perform the instalación de WordPress! Si tu proveedor de hosting te da acceso a Cpanel, lo más probable es que incluya una herramienta mágica llamada Softaculous Apps Installer (o alguna similar como Fantastico De Luxe o QuickInstall). Esta herramienta es un verdadero salvavidas para quienes no quieren lidiar con configuraciones técnicas complejas, ya que automatiza casi todo el proceso con unos pocos clics, dejándote libre para concentrarte en el diseño y el contenido.
- Access Cpanel: Log in to your Cpanel control panel. Generally, you can do this by typing
tudominio.com/cpanelotudominio.com:2083in your browser and using the credentials provided by your hosting provider. - Find Softaculous: Una vez dentro de Cpanel, desplázate hacia abajo hasta la sección de “Software” o “Aplicaciones Web” y busca el icono de “Softaculous Apps Installer” o “WordPress Manager by Softaculous”. Haz clic sobre él para abrir la interfaz del instalador.
- Start the Installation: Dentro de Softaculous, verás un listado de aplicaciones populares. Busca WordPress y haz clic en el botón “Instalar ahora”. Esto te llevará a un formulario de configuración sencillo.
- Configure the Crucial Details:
- Choose the Protocol: Select
http://ohttps://. Si tienes un certificado SSL instalado (lo cual es muy recomendable para security y SEO), eligehttps://. - Choose the Domain: In the dropdown menu, select the domain where you want WordPress to be installed. If you have subdomains, make sure to choose the correct one.
- Directory: Leave it blank if you want WordPress to be in the root of your domain (e.g. yourdomain.com). If you put
blog, WordPress will be installed in yourdomain.com/blog. - Site Name and Description: Introduce el título de tu sitio web (ej. “Biblioweb”) y una breve descripción. Puedes cambiarlos más tarde.
- Administrator Username and Password: ¡Crea credenciales fuertes y únicas! Anótalas en un lugar seguro. Evita usar “admin” como usuario.
- Administrator Email: Provide a valid email, as WordPress will use it for important notifications and to recover your password if you forget it.
- Select Language: Elige “Español” para tener el panel de administración en tu idioma.
- Choose the Protocol: Select
- Finalize the Installation: Revisa todos los datos y haz clic en el botón “Instalar” al final de la página. Softaculous se encargará de descargar WordPress, create la base de datos y configurar todo por ti. Este proceso suele tardar solo unos segundos.
Tip: It is vital that you use a unique and hard-to-guess administrator username and password. This is your first line of defense to protect your website from potential attacks. Security starts from installation!
Cómo verificar que ha funcionado: Recibirás un mensaje de éxito de Softaculous con los enlaces a tu sitio web y al panel de administración de WordPress. Podrás acceder a yourdomain.com to see your new website and to yourdomain.com/wp-admin to log in with your administrator credentials and start configuring it.
Step 4: Manual WordPress Installation (Via Cpanel and FTP)
Although the WordPress installation automática es muy cómoda, si por alguna razón no tienes Softaculous, prefieres un control más granular sobre el proceso o simplemente quieres entender mejor cómo funciona todo “bajo el capó”, la instalación manual es tu opción. Este método, aunque requiere más pasos, te enseñará mucho sobre la estructura de WordPress y cómo interactúa con tu hosting. Es una habilidad valiosa para cualquier desarrollador web o entusiasta.
- Download WordPress: Go to the official site wordpress.org and download the latest version of the WordPress package in Spanish. Save the .zip file in an accessible location on your computer.
- Upload the Files to your Hosting:
- Option A (Cpanel File Manager): Accede a tu Cpanel, busca la herramienta “Administrador de Archivos”. Navega hasta la carpeta
public_html(o la carpeta específica de tu dominio si tienes varios). Una vez allí, haz clic en “Cargar” para subir el archivo .zip de WordPress. Cuando se haya subido, selecciónalo y haz clic en “Extraer” para descomprimir todos los archivos directamente en esa carpeta. - Option B (FTP Client like FileZilla): Download and install an FTP client like FileZilla. Connect to your hosting using the FTP credentials provided by your provider (host, username, password, port). Once connected, navigate to the folder
public_htmlen el lado del servidor. En el lado local de FileZilla, descomprime el archivo .zip de WordPress en tu PC y luego sube todo el contenido de la carpeta “wordpress” (no la carpeta “wordpress” en sí, sino lo que hay dentro) a la carpetapublic_htmlof your domain.
- Option A (Cpanel File Manager): Accede a tu Cpanel, busca la herramienta “Administrador de Archivos”. Navega hasta la carpeta
- Create a Database and a MySQL User: WordPress needs una base de datos para almacenar toda la información de tu sitio (posts, páginas, comentarios, configuraciones).
- En Cpanel, busca la sección “Bases de Datos” y haz clic en “Bases de Datos MySQL”.
- Create a new database: Give it a descriptive name (e.g.
biblioweb_db) and write it down. - Create a new MySQL user: Assign a username and a strong password. Write them down too!
- Assign the user to the database: Selecciona el usuario que acabas de create y la base de datos, luego haz clic en “Añadir”. En la siguiente pantalla, marca la opción “Todos los privilegios” y haz clic en “Hacer cambios”.
- Run the WordPress Installer:
- Open your web browser and go to your domain address (e.g. yourdomain.com).
- Verás la pantalla de bienvenida de WordPress que te pedirá seleccionar un idioma y luego te informará que necesitará los datos de la base de datos. Haz clic en “¡Vamos a ello!”.
- You will see the WordPress welcome screen asking you to select a language and then informing you that it will need the database details. Click "Let's go!".
localhost). You can leave the table prefix as default (wp_Enter the exact database details you created: Database Name, Username, Password, and Database Host (usually - Haz clic en “Enviar” y, si todo es correcto, en “Ejecutar la instalación”.
- Completa la información final del sitio: Título del sitio, Nombre de usuario de administrador (¡diferente al de la base de datos y muy seguro!), Contraseña de administrador (fuerte y única) y tu Correo electrónico de administrador.
- Finalize the Installation: Haz clic en “Instalar WordPress”. En unos instantes, la instalación se completará.
Click "Install WordPress". In a few moments, the installation will be complete.
wp-admin,wp-content,wp-includesWarning: It is crucial that the WordPress files (all folders likepublic_htmland the loose files) are directly in your domain's root folder (usuallytudominio.com/nombre-de-carpeta.
). If you upload them to a subfolder, your site will be visible at yourdomain.com How to verify it worked: You will be able to access yourdomain.com/wp-admin in your browser and see the homepage of your new WordPress site. Additionally, you will be able to access the administration panel at
with the credentials you created in the last step.
The WordPress installation en tu propio ordenador es una opción fantástica para practicar, desarrollar y experimentar sin afectar un sitio en vivo. Es tu laboratorio personal, donde puedes probar temas, plugins, configuraciones y código sin conexión a internet y sin riesgos para una web pública. Es la ruta ideal para estudiantes, desarrolladores y aquellos que quieren aprender a fondo antes de lanzar su proyecto al world.
- on your own computer is a fantastic option for practicing, developing, and experimenting without affecting a live site. It's your personal laboratory, where you can test themes, plugins, configurations, and code offline and without risks to a public website. It's the ideal route for students, developers, and those who want to learn thoroughly before launching their project to the world.
- Install XAMPP or MAMP: XAMPP (Windows/Linux): Download and install XAMPP fromapachefriends.org
- . This package installs a web server (Apache), a database (MySQL/MariaDB), and PHP on your computer. MAMP (macOS): Download and install MAMP frommamp.info
- . It works similarly to XAMPP but is optimized for Mac operating systems.
- Download WordPress: Go to the official site wordpress.org Once installed, start the Apache and MySQL (or MariaDB) servers from the XAMPP/MAMP control panel. Make sure both are green or indicating they are running.
- and download the latest version of the WordPress package.
- Create a Folder for your Site: In XAMPP:
htdocsNavigate to the folderC:\xampp\htdocs(usually located in/Applications/XAMPP/htdocson Windows orhtdocs, create a new folder, for example,misitio-biblioweb. - In MAMP: In XAMPP:
htdocsNavigate to the folder/Applications/MAMP/htdocs). Create a new folder, for example,misitio-biblioweb.
- Create a Folder for your Site: In XAMPP:
- Unzip WordPress: Unzip the WordPress .zip file you downloaded. Then, copy todos los archivos y carpetas que están dentro de la carpeta “wordpress” (no la carpeta “wordpress” en sí) y pégalos dentro de la carpeta
misitio-bibliowebque acabas de create. - Create a Database:
- Open your web browser and go to
localhost/phpmyadmin. This is the interface for managing your local databases. - Haz clic en la pestaña “Bases de datos” en la parte superior.
- En el campo “Crear base de datos”, introduce un nombre descriptivo para tu base de datos (ej.
misitio_biblioweb_db) y haz clic en “Crear”. Para instalaciones locales con XAMPP/MAMP, no necesitas crear un usuario ni contraseña adicionales en phpMyAdmin, ya que el usuariorootwithout a password is used by default.
- Open your web browser and go to
- Run the WordPress Installer:
- Open your browser and go to the address
localhost/misitio-biblioweb(or the name of the folder you created). - Verás la pantalla de bienvenida de WordPress. Selecciona tu idioma y haz clic en “¡Vamos a ello!”.
- Enter the database details:
- Database Name:
misitio_biblioweb_db(or the one you created). - Username:
root(for default XAMPP/MAMP). - Password: Leave it blank (for default XAMPP/MAMP).
- Database Host:
localhost.
- Database Name:
- Haz clic en “Enviar” y luego en “Ejecutar la instalación”.
- Complete the final site information: Site Title, Administrator Username, Administrator Password, and your Administrator Email.
- Open your browser and go to the address
- Finalize the Installation: Haz clic en “Instalar WordPress”. ¡Tu sitio local estará listo en segundos!
Consejo: Una instalación local es ideal para aprender y probar cosas nuevas sin el riesgo de romper tu sitio web en producción. ¡Es tu laboratorio personal donde puedes equivocarte y aprender sin consecuencias públicas!
). If you upload them to a subfolder, your site will be visible at localhost/mysite-biblioweb in your browser and see your WordPress site running perfectly on your computer. You will also be able to access the administration panel at localhost/mysite-biblioweb/wp-admin.
Common problems and solutions
Even with the best guide, small obstacles sometimes arise. Here are some of the most frequent problems during the WordPress installation and how you can solve them effectively.
- Symptom: Error connecting to the database.
Solution: This is one of the most common errors. First, check the filewp-config.php(located in the root of your WordPress installation) and make sure the database name, username, and password are exactly correct. Also verify that the database server islocalhost(para la mayoría de los hostings y entornos locales). Si estás en un hosting, confirma que el usuario de la base de datos tenga “Todos los privilegios” asignados. Si usas XAMPP/MAMP, asegúrate de que el servidor MySQL/MariaDB esté en ejecución. - Symptom: Blank page or 500 error after installation.
Solution: Una página en blanco o un “Error 500 Internal Server Error” suelen indicar un problema con la configuración de PHP o con un plugin/tema defectuoso (aunque esto último es menos probable en una instalación fresca). Puede ser un problema de memoria PHP insuficiente. Edita el archivowp-config.php(just before the line that says/* ¡Eso es todo! Deja de editar. ¡Feliz blogging! */) and adddefine('WP_MEMORY_LIMIT', '256M');. If the problem persists, check your hosting's error logs (in Cpanel) or Apache/PHP logs in your local installation (XAMPP/MAMP) for specific error details. - Symptom: Styles, images, or broken links not loading (especially in local installation).
Solution: Este problema a menudo se relaciona con permisos de archivos incorrectos o con URLs mal configuradas. Asegúrate de que los permisos de las carpetas de WordPress sean 755 y los de los archivos 644. Si estás en una instalación local y experimentas esto después de mover el sitio o cambiar algo, es posible que las URLs en la base de datos necesiten ser actualizadas. Puedes usar herramientas como Better Search Replace o plugins de migración para corregir las URLs. Para instalaciones locales, verifica que Apache esté funcionando correctamente y que la URL en tu navegador coincida con la ruta de la carpeta de tu sitio. - Symptom: Too many redirects.
Solution: Esto suele ocurrir cuando hay un conflicto en la configuración de las URLs de tu sitio o con el SSL. En el panel de administración de WordPress (si puedes acceder), ve a “Ajustes” > “Generales” y asegúrate de que tanto “Dirección de WordPress (URL)” como “Dirección del sitio (URL)” sean idénticas y usenhttps://if you have SSL. If you cannot access, edit thewp-config.phpy añade las siguientes líneas antes de la línea de “¡Eso es todo!”:
define('WP_HOME','https://tudominio.com');
define('WP_SITEURL','https://tudominio.com');
Replacehttps://tudominio.comwith the correct URL of your site.
Frequently Asked Questions
Do I need to buy a domain and hosting for WordPress installation?
Yes, if your goal is for your website to be publicly accessible on the internet. The domain is your unique address (e.g. biblioweb.com) y el hosting es el “terreno” virtual donde se almacenan todos los archivos y datos de tu web. Ambos son componentes esenciales para que tu sitio esté en línea. Sin embargo, si solo quieres practicar o desarrollar un sitio en privado, puedes optar por una instalación local en tu propio ordenador, para lo cual no necesitas ni dominio ni hosting. Es una excelente manera de familiarizarte con WordPress sin incurrir en costos iniciales.
Can I move my site from a local installation to a hosting?
¡Absolutamente! Es una práctica muy común y recomendada en el desarrollo web. Puedes construir y probar tu sitio en un entorno local y, una vez que esté listo, migrarlo a un hosting en vivo para que sea accesible a todo el world. Existen varias formas de hacerlo: puedes usar plugins de migración populares como All-in-One WP Migration o Duplicator, que simplifican enormemente el proceso, o puedes realizar una migración manual exportando la base de datos e importando los archivos de WordPress vía FTP. En Biblioweb, tenemos detailed tutorials on how to migrate WordPress to make the process as simple as possible.
What PHP version do I need for WordPress installation?
WordPress always recommends the latest stable version of PHP to ensure the best performance, security, and compatibility. Currently, PHP 7.4 or higher is recommended, with PHP 8.0+ being the ideal option. Newer versions of PHP offer significant improvements in speed and efficiency, which translates into a faster website for your visitors. Most modern hostings already offer these versions by default, but it's always good to check in your Cpanel settings or by consulting your hosting provider.
Is it safe to install WordPress?
Yes, WordPress is an extremely secure platform if maintained and managed correctly. The WordPress installation en sí misma es segura, pero la seguridad a largo plazo depende de seguir buenas prácticas. Esto incluye usar contraseñas fuertes y únicas para tu administrador, mantener WordPress, todos tus temas y plugins actualizados a sus últimas versiones, y elegir un proveedor de hosting confiable que ofrezca medidas de seguridad adicionales. Además, implementar un plugin de seguridad y realizar copias de seguridad regularmente son pasos fundamentales para proteger tu sitio.
What are file permissions and why are they important in WordPress?
File permissions control who can read, write, and execute files and folders on your server. They are crucial for the security of your WordPress site. If permissions are too lax (e.g., 777 for everything), your site could be vulnerable to attacks. If they are too restrictive, WordPress might not function correctly (e.g., not being able to upload images or install plugins). Standard recommendations are 755 for folders and 644 for files. You can change them via FTP or from the Cpanel File Manager.
Conclusion and next steps
Congratulations! You have successfully completed the WordPress installation and now you have your own website ready to take off. This is just the beginning of an exciting digital adventure where you can share your ideas, tutorials, and knowledge with the world. You have laid a solid foundation, and now it's time to build upon it, customize it, and make your voice heard.
What's next now that your WordPress is installed?
- Explore the Administration Panel: Take time to familiarize yourself with all the options and sections offered by the WordPress dashboard. You will learn where to manage posts, pages, comments, appearance, and plugins.
- Install a Theme: Choose a design that reflects your brand or blog's personality. There are thousands of free themes in the WordPress repository and premium paid options with advanced functionalities. A good theme is the face of your site.
- Add Essential Plugins: Los plugins extienden la funcionalidad de WordPress. Considera instalar plugins para SEO (como Yoast SEO), seguridad, caché para mejorar la velocidad, y formularios de contacto.
- Create your First Pages and Posts: ¡Empieza a compartir tu conocimiento! Publica tu primera entrada de blog, crea una página de “Acerca de nosotros” y una de contacto.
- Configure Basic Settings: Revisa los ajustes generales, de reading, escritura y enlaces permanentes para optimizar tu sitio desde el principio.
If you liked this guide and want to continue learning how to creating amazing websites, discover the secrets of WooCommerce with advanced AI or keep up to date with the latest technology news, don't hesitate to explore more content on Biblioweb! Your success is our mission and we are here to accompany you every step of your digital journey.
Frequently Asked Questions
What is WordPress installation?
Do you want your website? Discover WordPress installation on hosting, Cpanel, or locally with our definitive guide. Start creating your online presence today
Why is WordPress installation important?
Te ayuda a obtener mejores resultados y tomar decisiones informadas sobre ¡No te compliques! 🤯 Guía Definitiva de Instalación de WordPress: ¿Hosting, Cpanel o Local? Elige tu aventura para #CrearPaginaWeb.
How to start with WordPress installation?
Follow the steps described in this article and apply the recommendations according to your case.
¿Prefieres que un profesional se encargue de la instalación y la puesta a punto? En adrianalcala.es ofrecemos ese servicio junto con optimización y SEO.